

If you’re using the free Google Sheets monthly budget template to manage your personal or family finances, you may have run into a problem while adding custom categories.
I’ve experienced this myself and found a solution that could save you a lot of time and frustration.
Google Sheets Budget Template: Add Custom Categories and Fix Transaction Tab Issue
In this article, I’ll explain how you can add as many custom categories as you want and still have them show up on the Transactions tab.
Watch the video above or follow these four steps and you won’t have to deal with this problem again!
In This Post:
- Create a New Sample Monthly Budget Template
- Add Your Custom Categories to the Summary Tab
- Use Data Validation on the Transactions Tab
- Copy Your Sample Monthly Budget Every Month
1. Create a New Sample Monthly Budget
To avoid issues with data transferring over from month-to-month, create a sample monthly budget and make a copy of that every month.
Go to Google Sheets, select “Monthly budget” and rename the spreadsheet “SAMPLE MONTHLY BUDGET TO COPY EVERY MONTH.”
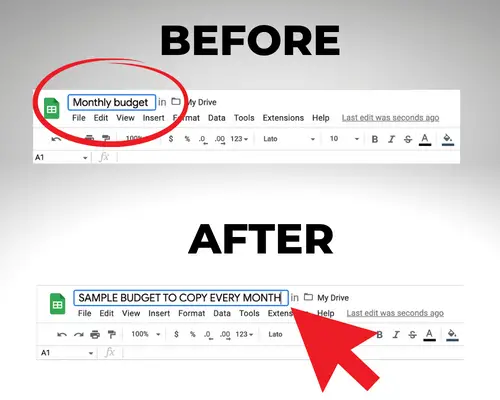
If you add custom categories to a sample monthly budget instead of your actual monthly budget, you won’t have to repeat the steps outlined in this article every month.
Instead, you’ll just make a copy of the sample monthly budget. More on that later…
2. Add Your Custom Categories to the Summary Tab
Next, let’s add your custom categories to the Summary tab. As you can see in the picture below, the bare-bones template has only three custom categories.
You can add as many as you want, but don’t just start adding new lines. That causes problems.

When I first started using Google Sheets, some of my custom categories from the Summary tab didn’t show up on the Transactions tab in the drop-down.
So when I logged a transaction, it wasn’t automatically updating the summary page.
After lots of research (and trial and error), I was able to figure out how to add custom expense categories without any headaches. Here’s what to do:
Add More Rows at the Bottom of the Template
The default Google Sheets budget template has three custom categories and room for only three more, ending on row 44.
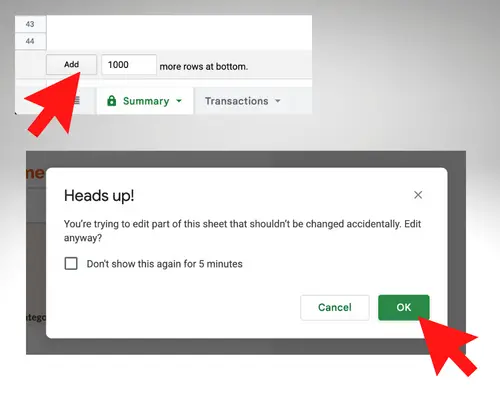
If you need to add more than three additional categories, click “Add 1000 more rows at bottom.”
When you click the button, you’ll get the following warning: “You’re trying to edit part of this sheet that shouldn’t be changed accidentally. Edit anyway?”
Don’t worry — it’s safe to click “OK” and continue.
Go to the “Custom category 3” Row of the Expenses
Next, navigate to the last pre-filled row of the Google Sheets monthly budget template on the expenses side, which is “Custom category 3.”
It’s very important that you don’t enter anything in the blank rows yet.
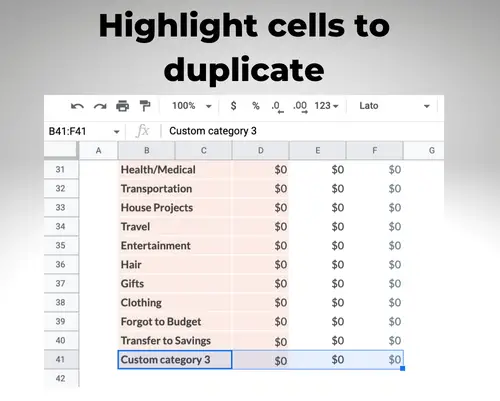
Highlight the Cells You Want to Duplicate
Now you want to highlight the cells to duplicate. To add custom categories on the expenses side, you should be on row 41 for “Custom category 3.”
You want to highlight cells B, C, D, E and F on row 41.
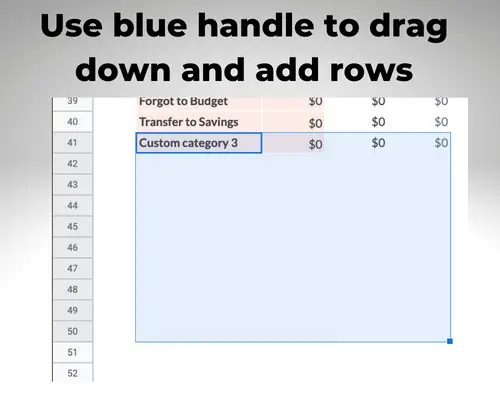
Drag Down Using the Blue Handle
Once you’ve highlighted the cells that you want to duplicate, a blue handle will appear on the bottom of row 41 and column F. Simply drag it down as many rows as you want.
I like to add nine rows so that row 50 is my last row of expenses.
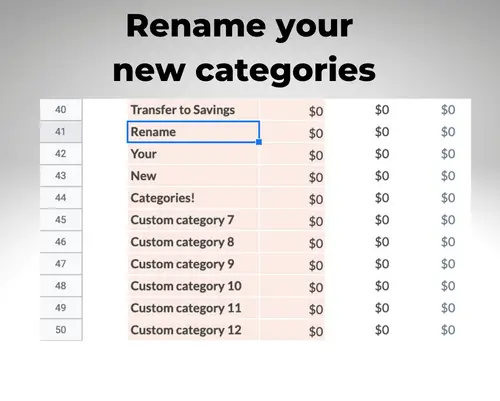
Rename the New Categories Anything You Want
After following the steps above, you’ll have new custom expense categories with generic names like “Custom expense category 4.”
At this point, you can safely rename them to reflect the expense categories you want in your budget.
3. Use Data Validation on the Transactions Tab
After you’ve added custom categories to the Summary tab, your work isn’t quite done. You want to switch over to the Transactions tab to make sure they all show up in the drop-down.
Before you leave the Summary tab, make a note of the last row that you added. (That’s 50 from my example above.)
Now from the Transactions tab, navigate to the category drop-down and see if your categories are all there.
From my experience, if you added more than three custom expense categories, some will be missing. Fortunately, there is a solution.
Here are the steps:
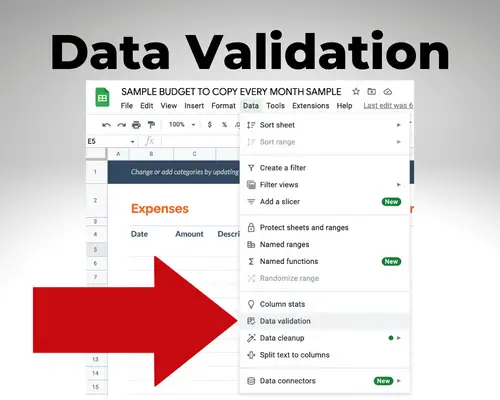
- Highlight the first cell under Category on the Expenses side of the Transactions tab (Row 5, Column E).
- From the Data menu, select Data validation.
- To the right, it should say Data validation rules. Select “Value contains one from range E5:E1033.”
- In the Criteria Summary field, click on the “Select data range” icon next to the =Summary!$B$27:$C$44 formula.
- Change the last two numbers of the formula to match the number of your last row from the Summary spreadsheet. (That would be 50 from the example.) Select OK.
- Click Done at the bottom of the “Data validation rules” screen.
To see the step-by-step process, check out my video tutorial starting at the 6-minute mark.
Once you make this change, go back to the category drop-down from the Transactions tab. All of your categories should now be there!
4. Copy Your Sample Monthly Budget Every Month
The problem should now be fixed, but how do you make sure it doesn’t happen to you next month? That’s why I suggested a sample monthly budget template.
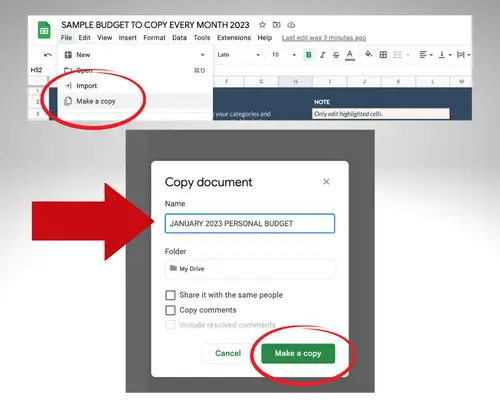
You want to copy the same sample monthly budget every month, not your actual budget.
Making a copy of your sample monthly budget is easy. Just open the spreadsheet, click File and then Make a Copy from the drop-down.
You can then rename it for the current month and start budgeting.
Final Thought
Was this post helpful? Leave me a note in the comments below. And if you’re already budgeting with Google Sheets, see my related guide that lays out my personal budgeting strategy.
I make a few additional tweaks to the Google Sheets budget template to save time every month!
OMG, this was so helpful! I was stuck and I found your video and worked through it step by step. Amazing and very much appreciated!! Thank you.
I’ve been experimenting with categorising expenses automatically and am wondering if you’ve come across any good solutions?
I use Empower and Mint for that!
Thanks for all this work man. Great stuff saving me lots of time!
Can you tell me why this sample budget already has values for expenses and income – should we just delete those in the sample so it’s not there each month? Thx!
Yes I cover that in my full tutorial here: https://michaelsaves.com/budgeting/google-sheets-budget-template/
OMG – I am not good at all of this and I really need to start a budget bec. I’m very unexpectedly divorcing. It’s SO overwhelming and this is just so so helpful. I hope it worked!!!
I cover things step-by-step in this article: https://michaelsaves.com/budgeting/google-sheets-budget-template/
I am a “to the penny” kind of person. How can I change the “start” and “end” balance on the Summary sheet to reflect the cents? If I try to add two decimal places, it gives me the warning about changing the sheet. Is it OK to edit it this way?
This was immensely helpful…Thank you! I’m an actor so I have a lot of expenses I have to keep track of. I need all the categories!
I saw this template in google sheets, downloaded it, seemed complicated and not what I was looking for, or so I thought. Then, I came across your tutorial. Wow, you explained it perfectly, and the Monthly Budget template makes so much more sense now. Thank you!!! I will use it now with more confidence and it is exactly what I was looking for. Thank again!
Thanks! Let me know if you have any troubles with it!
This was so helpful and crystal clear! Thank you so much- you saved me so much time.
Thank you, thank you! This article has been extremely helpful.
You are a Hero. Thank you
Thanks for these great instructions. I have multiple sources of income and therefore on the Transactions sheet on the Income side I have several rows of entries. My problem is that on the Summary sheet on the Income side it is only reflecting the first row of income from the Transaction sheet. I have tried to follow your videos/instructions for adding custom categories (https://michaelsaves.com/budgeting/add-custom-categories-google-sheets-budget/) and Irregular expenses (https://michaelsaves.com/save-money/google-sheets-budget-irregular-expenses/) and customizing budget (https://michaelsaves.com/budgeting/google-sheets-budget-template/#opentemplate) for editing Data Validation. Any further tips/instructions on how to get multiple rows of income to reflect in the summary would be greatly appreciated. Thank You!
I do not use the spreadsheet for income, but I’m not sure why the steps that you use for expenses wouldn’t apply to the other side. The template has 6 rows for income: Savings, Paycheck, Bonus, Interest, Other and Custom Category. Are you using MORE than 6 income sources? If so, I would add the custom categories like I did in the video on the expenses side. Then, on the transactions tab, do the data validation while hovering over J5, which says paycheck. Did you watch the video in this article? https://michaelsaves.com/budgeting/google-sheets-budget-template/. I would make a new spreadsheet, try to follow the instructions in the video while watching it, and if it’s still a problem email me a screenshot of your summary tab and transactions tab to [email protected]. Good luck!
Thanks for doing that! It seems like such a simple thing. It’s not like I was trying to solve a difficult formula or anything. They need to fix that.
I noticed that you make copies of the whole document for each month. I just duplicate both sheets and the change the months in the formulas. That may be my problem since I noticed that in the data validation of the top category box it’s using a sheet from Sep 2019, most likely my first month with this budget. I tried changing the criteria to the current month and year but it say to put in a valid range. I have no idea what to do. This kind of stuff is not my forte’
Yes I think that’s the problem, unfortunately. The formulas are very fussy. It took me some time to figure out all the things that work and don’t work.
I’ve run into this issue before but I just can’t remember what I did to fix it. I just googled it and figured it out but I can’t find it again.
How do I edit the name in “categories” and then have it reflect in the “transactions” tab in the drop down. For example I have a category named “Mortgage.” I want to change it to “Mortgage-House 1.” I can edit it in the Monthly Budget tab but then it won’t carry over to the “transactions” tab in the drop down menu. It stays “Mortgage” instead of “Mortgage-House 1.”
Thanks!
Hmm.. It should carry over, but I’m wondering if something went wrong with adding of the categories or data validation. I have a full text and video tutorial here that shows how I set up my budget: https://michaelsaves.com/budgeting/google-sheets-budget-template/
This was very helpful but when I attempt to add in “Transactions!E5:E1000”, it doesn’t stay. It goes back to “Transactions!E5”. Any ideas?
Thanks!
Did you click Save? If you follow the instructions in my video, it should work and you don’t have to do it more than once. Did you do it once and run into an issue with the spreadsheet? Or did you do it once and then just check to see if the formula was changed? I lay this out in my video and have not run into any problems logging transactions beyond the initial amount in the template. This month I’m up to 50+ transactions already. Help me better understand the problem you’re having and I may be able to help.
Thanks for your quick reply. I entered “Transactions!E5:E1000” into the formula box multiple times because it wasn’t there each time I checked. Should it be in the formula box each time I check? I haven’t run into any issues with the Sample sheet yet as I just created it. I did try the steps on a spreadsheet I created before finding your website and I’m still not able to generate a specific category. Since it’s the end of the month, I’m not going to bother with that particular sheet anymore.
Ok, gotcha. I recommend that you follow my video and/or article every step and make that sample budget (changing the formulas) and then copy that every month. Let me know how it goes in August. The purpose of entering the formula above is to make sure all the categories are reflected in the drop-down for lots of transactions. A good way to check that it works is to just go down to row 500 or something like that and enter a sample transaction, including the category. If the category shows up and the transaction reflects on the Summary page, it works. I wouldn’t worry too much about checking back on the formula after it’s entered. This hasn’t been an issue for me. Please update me on whether this works for you!!
Sorry for the repeated reply. The video in *this article* is the one that takes you step-by-step. It’s updated: https://michaelsaves.com/budgeting/google-sheets-budget-template/
Wow! This was incredibly helpful. I had already made my budget, but it wasn’t recognizing my new categories. I found this webpage, started over with a new budget, followed all your directions and now I’m all set. Really appreciate how detailed your instructions are. You saved me a lot of time and frustration. I just wish I’d seen this the first time.
Thank you. It took me some time to learn this spreadsheet, but I do love it. I’m actually overhauling my budgeting content to make it easier to follow. This comment is motivating me to get it done. Thank you again.
do you know how to change the colors of this sheet? I’ve been trying and I can’t change anything I like to use a color-coded system.
It’s possible, yes. There’s a paint bucket icon. https://www.youtube.com/watch?v=W7wjXGzB4hs
You are the best! Thank you for your expert knowledge I’m really computer savey but even the missing category problem stumped me. I laughed at myself when you pointed out the solution. I should have known lol.
I never leave comments on websites,,,,, but this was SO helpful! exactly what I needed. thank you!!!!
You, good sir, are a HERO. You fell on this sword for us all and I appreciate you. *high five*